4mm and Smaller Locomotive & Kit Construction
 Tony Gee and Jerry Clifford once again team up to tutor this ever popular course. Predominantly the course deals with locomotive and rolling stock building using etched or white metal cast kits.
The room caters for modellers of all scale up to and including 4mm to the foot, with typically a mix of gauges of stock being produced.
7mm And Larger Locomotive & Kit Construction
 Kevin Wilson will once again tutor the larger scale locomotive & kit construction course.
A room of 7mm and larger scale modellers building locomotives and rolling stock items from etched or cast metal kits.
Improving Ready to Run and Kit Rolling Stock
 Karl Crowther will return to once again to lead this weekend spent exploring how to make improvements or modifications to ready to run stock and plastic kits.
This ‘hands on’ course is aimed both at modellers of all levels. Modellers should bring along projects they wish to work on with supervision and suggestions provided by Karl.
Painting & Lining
 Following the unavoidable cancelation of this course in our March weekend new tutor Geoff Haynes will be with us for the October weekend.
This is a mixture of a taught course with hands-on painting and lining exercises. Modellers usually bring a few models to paint and/or line under Geoff's expert tuition.
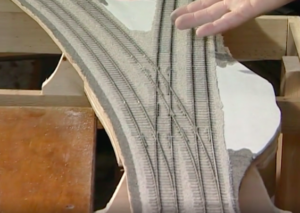
Building and layering scale track work with Tony Geary.
Tony will cover all the aspects of building your own scale track work, focusing in points and crossing. He will also demonstrate his techniques for ballasting and laying track.
Tony is taking over this course from our tutor of many years, Norman Solomon and will bring his own slant to track building and laying.

Chris Hopper will once again be taking the weathering course. Chris will cover a variety of methods for achieving realistic weathered effects on your models, using both air brushing and non-air brushing techniques.
A limited number of air brushing stations will be available for those that do not have their own.